Weathering, Soil, and Ground Profiles
Read soil horizons, residual ground, colluvium, saprolite, oxidation, and transported cover before you dig.
By the end of this module
- Read a basic soil profile
- Distinguish residual from transported material
- Recognize weathered mineral clues
You’ve hiked to a promising spot below an old prospect pit, and the ground in front of you is a soft, crumbly, rust-colored mess. Is that decomposed bedrock you can dig straight through, or a foot of transported junk sitting on top of the rock you actually care about? Get this wrong and you’ll spend an afternoon digging in the wrong material entirely. This module teaches you to read the ground itself before you ever swing a pick.
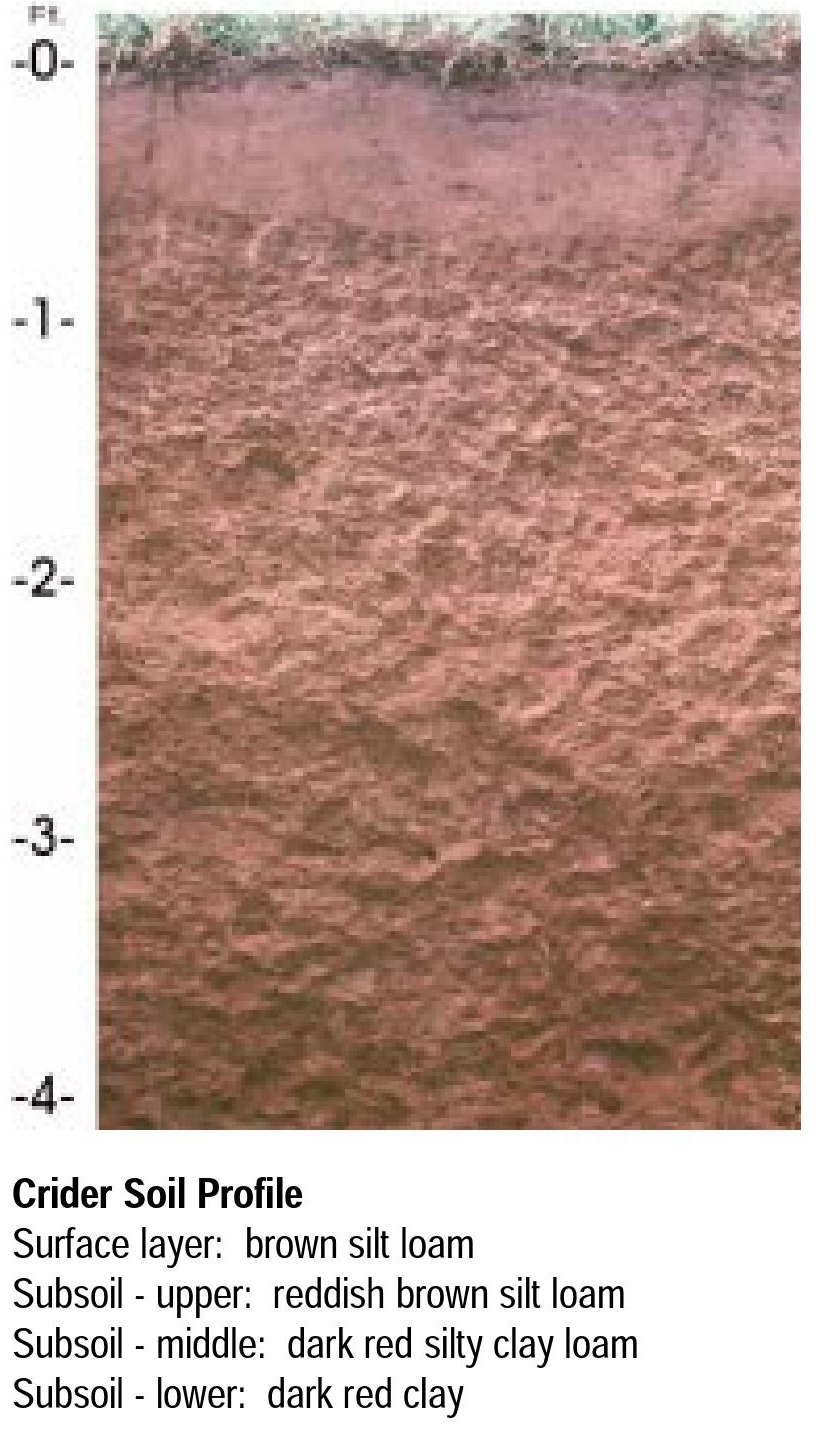
The Soil Profile — What’s Really Under Your Boots
Soil scientists describe a standard vertical sequence of horizons from the surface down. Not every site shows all of them, and thicknesses vary enormously, but knowing the sequence tells you what you’re looking at:
| Horizon | What it is |
|---|---|
| O | Organic layer — leaf litter, humus |
| A | Mineral soil with organic accumulation; most biologically active |
| E | Zone of leaching (eluviation), often visibly bleached |
| B | Subsoil; zone of accumulation (illuviation) of clay, iron, and aluminum washed down from above |
| C | Weathered parent material, only minimally altered by soil-forming processes |
| R | Unweathered bedrock |
For a prospector, the practical takeaway is simple: the C horizon is your transition zone, and the R horizon is the bedrock you’re often trying to reach — whether you’re chasing a vein outcrop or a bedrock trap in a placer deposit.
Colluvium, Residual Soil, and Saprolite — Three Things That Look Alike but Aren’t
This is the single most useful distinction in this module, and it’s the one beginners blur together most often.
Colluvium is soil and rock debris transported downslope by gravity — everything from slow creep to near-instantaneous rockfall or landslide deposits (NRCS Chapter 4, Elementary Soils Engineering). Field clue: unsorted, angular fragments, thickening as you move downslope, often with a mix of rock types that don’t match the bedrock directly beneath your feet — because that material came from somewhere upslope.
Residual soil forms in place from the underlying bedrock through weathering and has lost essentially all of the original rock’s fabric and structure. It looks like soil because, structurally, it is soil now.
Saprolite is chemically weathered ("rotten") rock that still retains the original rock’s structure — foliation, jointing, even bedding — even though it’s soft enough to dig with a hand shovel (USGS Professional Paper 1352). This is the transitional zone between fresh bedrock and true residual soil.
The Practical Field Test
| Material | Origin | Structure visible? | Sorting |
|---|---|---|---|
| Residual soil | Weathered in place | No — original rock fabric destroyed | Not applicable (no clasts) |
| Saprolite | Weathered in place | Yes — foliation/jointing still visible, but crumbles like soil | Not applicable |
| Colluvium | Transported downslope by gravity | Mixed rock types, no single bedrock signature | Unsorted, angular |
Ask yourself: does this crumbly material still show joints or foliation lines running through it, matching the orientation of nearby outcrop? If yes, you’re likely in saprolite, and the mineralogy you’re seeing is genuinely tied to what’s directly below. If the material is a jumbled mix of angular rock types that don’t match your local outcrop, you’re probably in colluvium that traveled from upslope — and any mineral grains you find there may have come from somewhere else entirely.
Caliche — Colorado’s “False Concrete”
In the drier parts of Colorado — the eastern plains and many intermountain basins — you’ll run into a hard, cemented layer often called a K horizon or calcic horizon: caliche. Calcium carbonate dissolved from atmospheric dust and near-surface carbonate reprecipitates at depth (typically 2–4 feet below the surface) as the soil dries, cementing gravel, sand, clay, and silt into something that feels like concrete (geology.com; Wryheat blog on caliche).
Why prospectors care: caliche can act as a false bedrock, trapping heavy minerals above it in gravel deposits, exactly the way real bedrock does. Dig down, hit a rock-hard layer, and stop — and you may have just quit above a productive concentration that continues below.
Field test: caliche fizzes vigorously with dilute HCl (the calcium carbonate reaction), while most silicate hardpans show no reaction at all. This is the fastest way to tell “I hit false bedrock” from “I hit the real thing.”
Weathered Mineral Clues
As rock weathers, some minerals break down and others become more visually obvious:
- Iron-bearing minerals oxidize to rusty red-brown-orange staining (iron oxides/hydroxides) — a classic surface clue to sulfide minerals weathering at depth, sometimes called a “gossan” in more developed form.
- Quartz survives weathering essentially unchanged, so quartz veins and quartz float often stand out sharply against a more weathered, softer surrounding rock.
- Feldspars weather to clay, which is why granite outcrops often show a soft, sandy-to-clayey weathering rind you can crumble by hand, in contrast to fresh unweathered granite a few inches deeper.
Myth Check: “Crumbly Ground” Isn’t All the Same
A beginner’s instinct is to treat all soft, diggable material as equivalent — dirt is dirt. It isn’t. Crumbly ground with visible relict structure (saprolite) is telling you about the rock directly beneath it. Crumbly ground with a jumbled mix of rock types and no structure (colluvium) is telling you about a slope process and possibly a source area far upslope. And a rock-hard layer isn’t necessarily bedrock — it might be caliche a few feet above the real thing. Treating them all the same is how prospectors both waste time and abandon good ground too early.
Common Mistakes
- Digging through saprolite and calling it “decomposed bedrock,” full stop — true, but don’t forget the structure it preserves can still point you toward a specific vein orientation.
- Assuming a hard layer is always bedrock. Run the acid test before you conclude you’ve hit rock.
- Ignoring colluvium’s mixed source. Panning colluvium and finding a mineral doesn’t confirm a local source — it may have traveled downslope from an unknown upslope deposit.
- Not checking depth to caliche in dry basin settings. Two to four feet is typical, but it varies; don’t assume your first hard layer is the only one.
Why This Matters Before You Ever Pick Up a Pan
Everything downstream in this course depends on getting the ground profile right first. If you’re evaluating a lode prospect, saprolite tells you the mineralogy directly below is locally derived, while colluvium warns you that whatever you’re finding might have traveled from an unknown source upslope — a very different exploration problem. If you’re evaluating a placer site, knowing whether you’ve hit true bedrock or a caliche false bedrock determines whether you keep digging or wrongly conclude the site is barren. Module 5 will build directly on the false-bedrock concept introduced here, and Module 4 will extend the sorted-versus-unsorted thinking from colluvium into glacial deposits. Get comfortable reading a profile now, because you’ll use this skill on literally every site you visit.
Field Exercise
Find a road cut, streambank, or eroded gully near your prospecting area. Sketch the visible profile from top to bottom, labeling each zone you can identify (O/A/B/C/R, or colluvium/saprolite/residual soil if that framework fits better). For any hard layer you encounter, note whether it fizzes with dilute HCl. Record depth, color, and whether any structure (foliation, jointing, bedding) is visible within each zone. Use this simple table format in your notebook:
| Depth (in) | Zone/horizon | Color | Structure visible? | Acid test | Notes |
|---|---|---|---|---|---|
| 0–4 | |||||
| 4–18 | |||||
| 18+ |